Showing posts with label reverse glass. Show all posts

Monday, January 11, 2021

Another One Finally Checked on the "To-Do" List


These little mirrors are smaller versions of the typical early 19th century "cottage" mirrors with their split balusters, corner blocks and a panel at the top. The antique version would hold a reverse glass painting. These mini versions usually had a print of a "Colonial" scene, and judging by the photos or prints they appear to be from the 1020s or so.

They show up fairly frequently, and I don't know why I bought this one. Probably just felt bad for it. I spruced up the frame and did a reverse glass painting. It now looks more like a period mirror.

This wasn't a particularly difficult or time consuming project, so why was it on the wall of my workshop, staring reproachfully at me for a few years before I finally tackled it? As they say, "the cobbler's children....".

Anyway, another of the pandemic era projects is finally done!


Finished. Approximately 13" high.


In its original state

Sunday, February 25, 2018

A Little Light Classical

Finished eglomise panel


I accumulate mirrors, sometimes just for the glass panels. Of course, sometimes these were broken, but I have them for my archive and use them to make a copy.

This mirror is one I purchased for the panel (earlier post here),  and after making my copies (another post here), decided I wanted to make the mirror useful again. I had been wanting to do something in a classical vein, with a more refined image, and wanted a mirror with a more delicate frame to match. Aha, I had this one on hand.

Mirror with original broken panel


I found an image in one of the Dover books on classical themed illustration, and used that as the basis for this version.


The procedure is the same as I have described in other blog postings: Gold leaf on the glass, etch, backup areas with black, then apply background paint.

Gold leaf backed u p with paint


Finished project


Tuesday, December 29, 2015

Acrylic Reverse Glass Painting


"Cottage" Acrylic Reverse Glass Painting (pardon my reflection)

I was asked about demonstrating reverse glass painting for a group of teachers as part of their "development days". I was cool to the idea, since the use of oil paint and solvents (not to mention glass) did not make this suitable for the elementary school classroom. Since traditional methods were out, It was suggested that I try it with acrylic paint on acrylic sheet, instead of glass. So, on this first snowy day of the season, I tried this.

The design is based on a typical cottage/river scene, found on many country mirrors. As this was a test, I didn't bother with my usual step of scanning and reversing the original to use as a pattern. I simply placed my acrylic sheet over the original and did the basic outlining with a liquid (rather than heavy body) acrylic, mixed with blending/retardant medium.

I followed the basic steps of reverse glass - outline, glazes for shadow areas, foreground, then sky.

Outlining basic design


Adding glazes to shadow areas


More glazing and color

The back side never looks too good

Some differences (aside from the thrill of completing a reverse glass panel over a couple hours instead of days!):

While you can achieve the transparency via the use of medium, it does not seem to flow onto the "glass" as smoothly when using oil/varnish on glass.

As is the case with my easel painting, the acrylic, even with the medium, still seems to get "gummy", making smooth blends and transitions more difficult.

My other difficulties were due to the use of whatever paints and brushes I had on hand - I wasn't using my traditional palette, and did not have many brushes that were as flexible as I would like. You definitely can't get good results with typical stiff painting brushes.

I suspect that some of these issues could be overcome with more experimentation, and for this test, I was not as painstaking as I normally am.
Finished glass with original


Still, this might be a good option for when you want to teach in an environment when solvent based materials are not allowed.


Wednesday, June 17, 2015

Crossing the Finish Line with Two More Projects

The overmantel mirror is now completed and installed, and the Salem mirror panel safe in Florida.

Once all the gesso repairs to the overmantel were done (as shown in Part I), coloring, gilding and toning began.


The bottom right section of "ebony" base was missing, so a new piece was made to fit.


Base replacement in progress

By securing a new backboard covering almost the entire back, I was able to pull the frame together, and the separations between the dividers and bottom rail are almost gone. This also allowed installation of an aluminum cleat system that will not only support the weight (and due to the plate glass mirror, this is heavy!), but will also keep it from shifting on the wall.

I helped the clients install this. A piece of plywood was mounted to the wall, since it was not a wall built with standard stud spacing, and had lathe/plaster that would have made it difficult to mount directly. The bottom sections of the interlocking cleat pairs were mounted on this board, then the mirror was dropped into place. Since this was a job requiring all hands on deck, no photos of this process.

In the end, all worked out well, the mirror seems secure (and if it ever falls, we'll blame it on the cat).

Installed (disregard the ghost in the mirror)
 

The Salem mirror project also reached completion. This required sending the finished glass panel to Florida, packed in a way that kept it secure, but with no pressure or material in contact with the painted surface on the back of the glass (concern about abrasion and humidity led to this decision). The customer was able to install the glass successfully, and kindly sent me a picture of the completed mirror.

 
As hanging now in client's home


Wednesday, May 27, 2015

Is the Salem Mirror Panel Finally Done?

I have just finished another version of the Salem mirror panel started in part I.

This has a number of adjustments, including color changes, and additional detail for a livelier wharf scene. I'd really like to another version, but I'm afraid that might send my very patient customer over the edge, as it has been almost a year since this project began.


Saturday, May 16, 2015

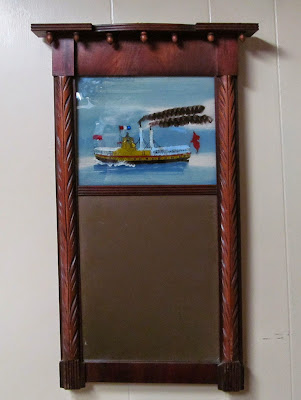
Paddle Wheeler Mirror


Mirror with reverse panel

 I normally avoid buying these  wood frame mirrors, but somehow I seem to be winding up with a collection of them.  This one also had the style of reverse glass painting I dislike, where the picture is done with a dotted outline, then filled in much like a child's coloring book. And while this one had the original glass panel, it was badly repaired at one point.

So, why did I buy it? Well, it was very inexpensive, and I thought it was interesting because the reverse glass painting was of a paddle wheel steam boat with the name "Webster".  Up to now I have avoided making any paintings in this style, but this was interesting enough to make me do one for my portfolio.

Close-up of panel. Bright yellow spot and light blue stern end are some of the old touch-ups.


Looking at this, and another reverse panel I have in my collection, I tried to determine the procedure for this style. I had originally assumed that this was some form of stencil, but under close examination, it appears that the dots are applied individually (perhaps one day I will find two identical panels and be able to compare them to test the stencil theory. Perhaps one reason for using this dotted line style was that it required less dexterity with a brush to paint smooth lines, or may have simply been for artistic effect.

As usual, I began by making a tracing of the original. I applied my dotted outline by dipping the end of a bamboo skewer in the paint, then tapping out my line of dots. A look at some illustrations confirmed what should be in the "missing" sections due to the original's repairs.

While the primary goal is to document the original, in some cases, such as this, there are some aspects that are too crude or badly done to replicate. The flags had a metal foil backing (a technique known as "tinsel painting"), but the paint detail was badly done. I also wanted two of them to more accurately depict American flags. I changed the water and sky color a bit out of personal preference, but will likely change again when I do another version to place in a mirror frame.

As of now, the source of this design is a mystery.  I have found some other examples, with the same style of frame and painting, representing different steamers. This leads me to believe someone decided that this was a market niche, and whether done here, or more likely, ordered from Europe, there must have been some demand for them. It would be interesting to find out if these were actually used on any of these boats, were sold as souvenirs to passengers or crew, or simply capitalized on local interest and pride for the boats' home ports.

I contacted a historic steamship  organization, and while there were some with the name "Webster" in their databases, there was no way of knowing which, if any of them were mine. I don't have a great interest in maritime subjects, but now I'll have to keep my eye out for an image of this side-wheeler.

And for now, at least, I have another item for my collection of "mirrors I don't like".


My version


Wednesday, April 1, 2015

Salem Harbor Reverse Glass Painting (Part I)

One of my current projects is a reverse painting on glass of a harbor scene.

This request came from a man in Florida who wanted a panel in a mirror, but had no original to copy. Since the mirror was possibly not period, and there was no restriction on the design, the decision was made to honor his wife's home town of Salem, Massachusetts. And since the style of the mirror is Federal, which is the period at which Salem was at its height, this seemed like a good match.

I had done something similar before, but there were difficulties finding images that were iconic enough to be read as "Salem" without presenting historic anachronisms.

The solution was to use a section of a painting in the Peabody Essex Museum showing Crowninshield's wharf. This reflects the influence of the China trade which brought wealth to Salem, and the influence of Asian decorative arts to the western hemisphere.


Panorama of Crowinshield's Wharf at the Peabody Essex Museum


Detail of painting selected


Due to our now famous "winter from hell", as well as assorted mishaps and other issues, our planned trips to the Peabody to view the painting in person kept falling through. The test panel I am preparing to work out the design will have some areas of ambiguity, as the on-line image was not of high enough resolution for me to see all the detail. I am planning that before the final panel is done, I will be able to photograph the original painting.


The first steps were to create a pattern, which, thanks to modern technology, was not difficult (as long as you remember to flip it, since you are painting in reverse!). I added a "Salem" sign to the side of the building, as it seemed the most graceful way of identifying the location.


Color testing on scrap glass (as seen from back)


Since this was a complete new creation, I needed to make at least one preliminary glass. This is not as refined as I want in a finished glass, but it is simply to work out the design, colors, and find out where the problems will arise. In fact, it may even be necessary to do another pass at a test panel before the final, but even if that is necessary, it will still be possible to work on that and the final panel simultaneously.


Even simple designs require drying times between some steps. In this case, there are more steps involved, and the logistics of what to paint in order to shorten the process can be frustrating.


A front view as the work progresses

Completed test panel.


As this progresses, I already have notes on what will change in next version. I'll probably need to do a second test panel before the final.

More to come later....


Friday, March 6, 2015

Another Reverse Painting for a Mirror

Completed Mirror. Frame required only minor cleaning.


These small mirrors are fun to do. The reverse paintings were often these simple, folky scenes, and this one of the "cottage by a river" is pretty typical. 

Typical also is the condition these panels are found in. In addition to general deterioration, there were earlier attempts to fix the painting. As we can see, these rarely turn out well, and replication is the better option.


Original panel.  (the number on the tape is just for my tracking purposes).


My version of the panel.


Tuesday, August 19, 2014

Shell Game: Another "Finished" Project

When working on a restoration project, part of the decision-making is "how far to go" and what to replace. Will you return to pristine condition, "looks good", or just keep it from falling apart further?

With this mirror (see earlier post),  the most glaring defects where the missing shell ornaments, and the unappealing, and badly deteriorated scenic panel. Aside from these issues, it was mostly intact and original.

I cast replicas of the shells, gilded them and then put them in their corners. These were originally placed in beds of compo material, and they probably detached as the material dried over the years. Mine were bedded with an epoxy putty.

Since the reverse painting was not that attractive, I did not want to make a replica. I put in a plain mirror plate, and since the mirror frame is so ornate, I find this a more elegant, restrained solution. At some point, if I find a design I like, I may replace with a reverse painting.

There are still numerous small losses and chipping, particularly around the edges. These have been tinted to make them less obtrusive. If a more pristine look is desired, they can be repaired as well, but the age of this mirror, combined with it's edge construction makes it naturally prone to this type of damage and decay.


Compo bedding that held (or didn't hold) the original shell.


Replacements,and new bedding material in corner.


New shells installed


Replacement shell toned to match.

Monday, July 1, 2013

A Volcano Under Glass

I have often seen prints and paintings of the eruption of Mt. Vesuvius. Most of these seem to have been "grand tour" souvenirs, and often depict the eruption at night - probably for the opportunity to have a dramatic lighting effect.

While browsing Ebay, I came across a mirror for sale that had a simple scene of an active volcano - presumably of Vesuvius, since it had an eruption in 1822, and would have been close enough in time to use as a recognizable subject.


Glass found on Ebay
 
The Ebay glass was far too primitive for what I had in mind, so I devised my own design, working in the style of the European scenes we find on these glasses.

My volcano scene

I installed the glass in the mirror frame discussed in an earlier entry. This frame did in fact, appear to be an antique, that had some restoration work done at some point, with some missing components replaced, and likely an entire re-gilding. As the work is acceptable, I will leave as is.


Installed in mirror

Friday, June 28, 2013

Green Skies, Smiling at Me!

While demonstrating eglomise work during the Grafton Historical Society's Antique Show on June 15, I began my version of the broken original glass shown in this earlier blog entry. This is an interesting glass in that it appears as if the original craftsperson worked from three individual designs and just arranged them in a row. The green color was interesting; I don't know if it was originally blue and had changed over the years, but I elected to use it in my version, as it was what drew me to the original in the first place.

I adjusted the composition a bit, as the mirror my version went into had less height available for the panel, and I actually think it looks less awkward than it does in the original size.
 
Joseph's version of the original

As installed in a mirror frame